Brother HL-1450 (1240/1250/1440) laser printer – adding an Ethernet Port
First created 6 Nov 2020.
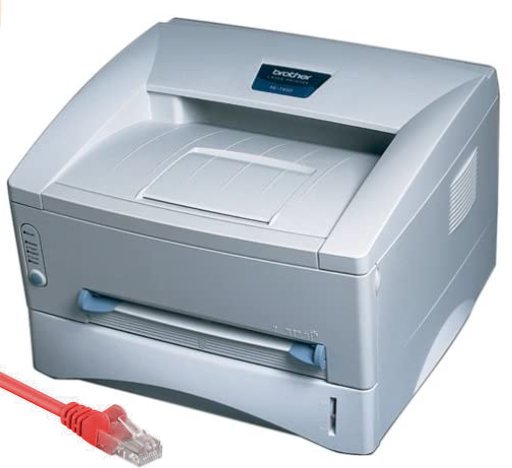
I've owned a Brother HL-1450 laser printer since its purchase in 2004. It has a centronics parallel port and USB1 socket for connectivity.
In recent years, the printer has been wired via USB to old routers running opensource firmwares such as Tomato, OpenWrt, or Padavan, dedicated to enabling the printer to be shared with multiple computers. This is known as a print server. It works with my Windows, linux and Hackintosh computers.
A relative owns the exact same model of printer wired to a Tomato router. However, every now and again, when they send a document to print, it would just get stuck in the print queue on their Windows computer. Deleting the print job and resending made no difference. Turning off the print server and laser printer would resolve the issue – the document would have to be subsequently resubmitted. I discovered many years ago, performing a scheduled reboot of the router (print server) every 24 hours helped, but it didn't totally prevent the issue from re-appearing. They put up with the issue for many years as it was infrequent.
More recently, I decided to investigate the problem by replicating their printer setup.
To cut a long story short, I discovered the print server and laser printer could be 'locked out' under certain circumstances. It could be reproduced in OpenWrt, so it wasn't confined to using Tomato software on the router.
Here is the scenario:
Printer server is on 24/7.
Laser printer is usually switched off to conserve energy. (The Brother HL1450 consumes about 6 watts in standby, which is high by today's standards)
Person A submits a document for printing.
The print server receives the request and tries to forward the print job data to the laser printer.
However, the laser printer is off-line.
If the laser printer is turned on, the document will be printed successfully.
HOWEVER, if Person A chooses not to switch on the printer, turns off their computer, or perhaps cancels the print job by deleting it from the print queue on their Windows computer. This is when problems occur.
The print server is pretty dumb, it simply does NOT expect the print job to be interrupted, and will continue to try to connect to the laser printer and print whatever data it has received.
Person B decides to print a document to the same laser printer.
However, discovers the document is stuck in the print queue on their computer.
Person B then turns on the laser printer, expecting their printed document to appear. However, nothing is printed.
The reason is the printer is still trying to action the previous request to print a document from Person A. However, the data received from Person A may be incomplete and therefore causes the HL-1450 laser printer to lock out with a DATA error on the printer's status panel.
To resolve the problem, both the laser printer and the print server must be power cycled. The document sent by Person B to the printer may be lost and so will have to be resent.
The above lockout condition can be prevented by ensuring the laser printer and print server are both switched OFF when not in use, or ON when required.
For this reason and to eliminate the need for an external print server, I decided to retrofit a print server into my old Brother HL-1450 laser printer. Both the printer and print server would be powered on or off by a single On/Off switch on the printer. I needed to find a compact router which could also be powered off the laser printer's power supply unit.
Most of the newer pocket travel routers such as Tplink TL-MR3020 or GliNet MT300n are USB powered. According to the service manual, the Brother HL-14xx series is fitted with a 5 volt 1.6 Amp PSU. Drawing 5 volts from this PSU to power a pocket router might draw too much current, so I needed to look for a router with built in AC power supply.
The TP-link TL-WR710N and TL-810N travel routers have built-in power supply units, and used examples on eBay are relatively cheap.
Warning: Stay clear of the TL-WR710N v2.0. It only has 4MB RAM. The HW version number is printed on label stuck to the router. The v1.0, 1.1, 1.2 and 2.1 have 8MB RAM.
The first step is to remove the covers. I found a service manual for the Brother HL12xx/14xx series laser printers. There are half a dozen screws and some partially hidden plastic clips. Once I worked out how to disengage the clips, the covers came off quite easily. I have uploaded a copy to my Dropbox folder.
https://www.dropbox.com/s/osdfcsnulwktwme/BROTHER HL-1230, HL-1440, HL-1450, HL-1470N SM.pdf?dl=0
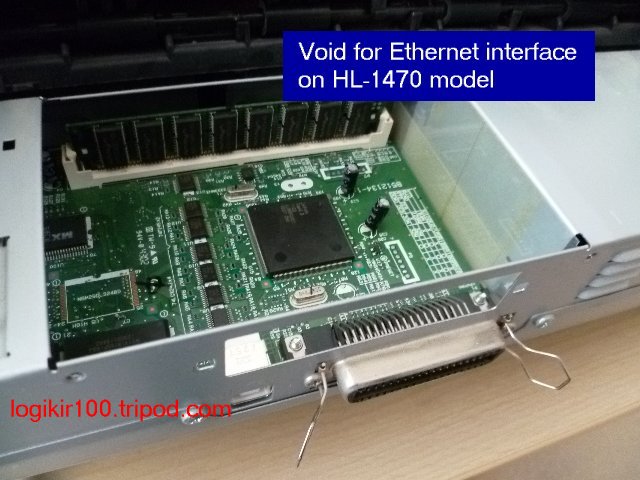
The HL-1450 has a void for a network interface card found on HL-1470 model. The TL-WR710N can squeeze into this void. However, the RJ45 and USB sockets were facing in the wrong direction.
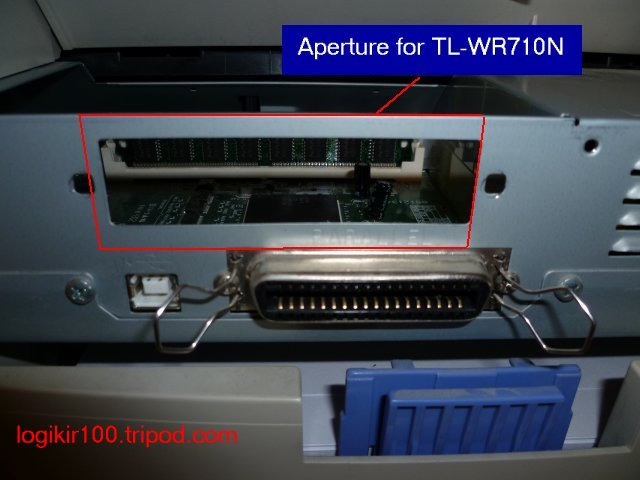
I wanted the RJ45 and USB sockets to face out of the rear of the printer, so W decided to enlarge the existing blanked off aperture. Part of the router would protrude out of the back of the printer.
The sheet metal was easy to cut with a dremel tool fitted with a cutting disc.
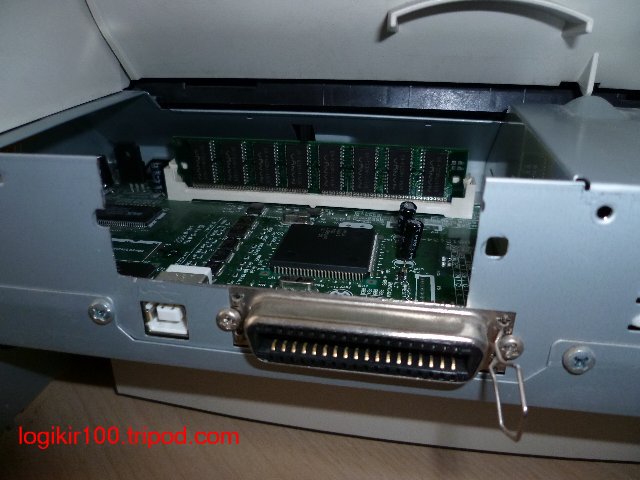
I couldn't remove the exposed circuit board, so I carefully masked off the circuit board and any gaps with 2 inch masking tape. Do not press down hard on the masking tape as you may leave adhesive residue, or even pull off the very delicate and small surface mounted components when you subsequently try to remove the tape. Then laid tissue paper on top to catch the fine grinded particles.
Once I'd finished enlarging the aperture, I used a vacuum cleaner to suck out any particles before removing the masking tape. Then vacuumed again.
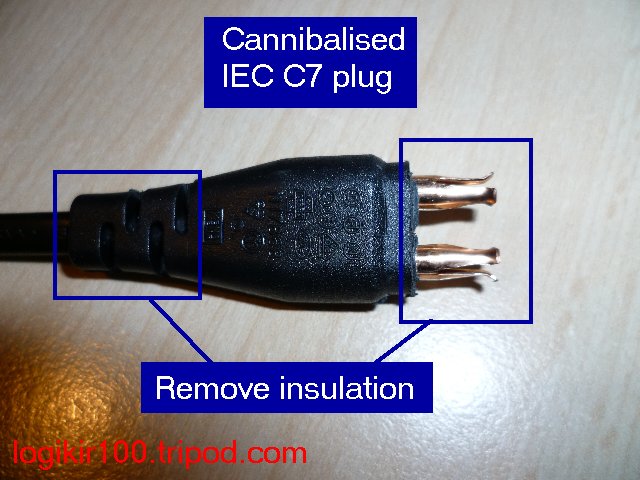
Turning our attention to the TP-link travel routers, the later TL-WR710N and TL-WR810N have a detachable AC plug. The pins are slightly larger than 2.5mm diameter. I cannibalised an IEC C7 (also known as figure-8 AC cable) by using a junior hack saw to remove the hard plastic insulation around the copper contacts. I just carefully sawed around the circumference of the plug, and then down the middle between the two copper pins. The pieces then just pulled off very easily.
I also had to carefully remove the moulded strain-relief using a pair of precision wire cutters. Extra care had to be taken to ensure the existing black PVC sheath was not severely damaged.

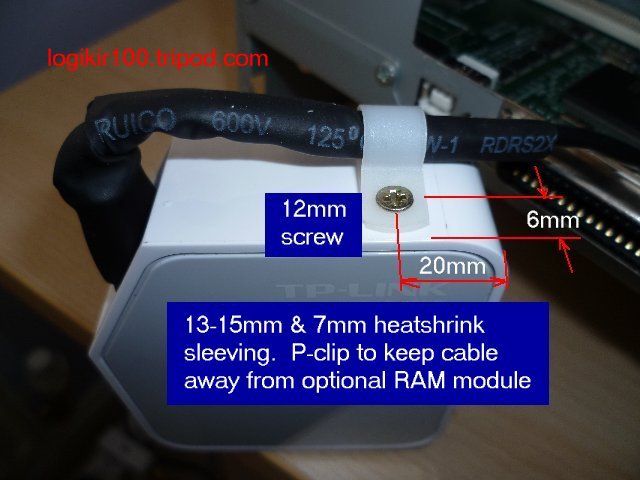
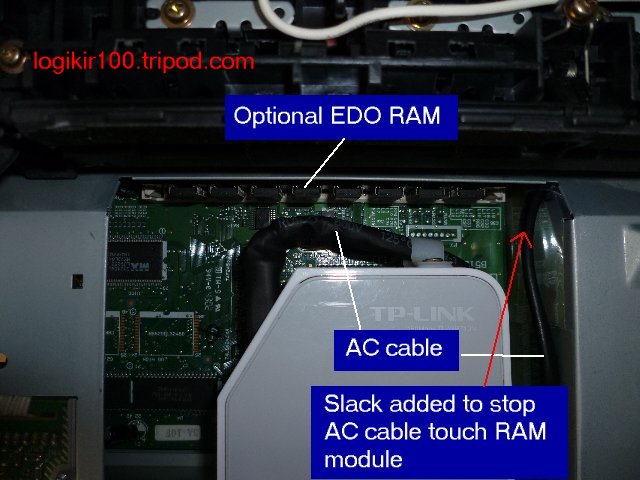
The purpose of removing the moulded strain-relief, was to make it easy to bend the PVC sheathed cable at a right angle. Otherwise, the cable could touch the optional RAM module. A P-clip was added as show below. Alternatively, a piece of 120x50mm duck tape could perhaps be used to secure the cable to the side of the router.
Generally, I'm not totally happy with the idea of running high voltage wires so close to sensitive low voltage electronics. It is something you need to consider from a safety point of view.
Heatshrink sleeving covers the exposed copper terminals. I used the largest 13mm diameter heatshrink I could find, which I expanded to 15mm with a pair of screwdrivers, so it could cover the plugs where it is inserted the router power socket.
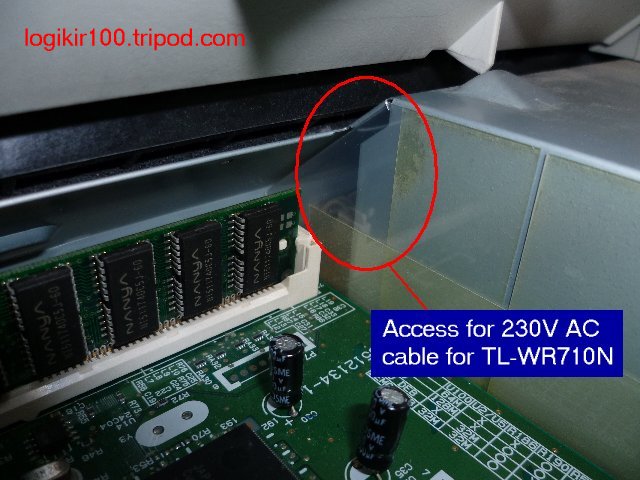
The next step was to feed the 2 core AC cable from the router to printer's On/Off power switch. Fortunately, there is a direct path through the laser printer's power supply zone. See one of the openings below.
The transparent electrical insulation plastic sheet was peeled back a bit (it cannot be totally removed) and cut with scissors to create an opening through it for the AC cable.
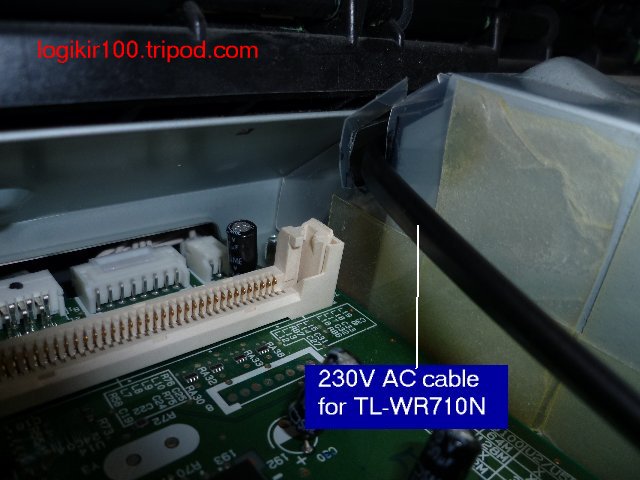
The other opening can be seen below. It is a half inch round hole where white coloured wires carry high voltage feed to the fuser unit. I used a stiff 3mm rod fed into the round hole until it appeared out th other side of the power supply unit. Then taped the AC cable to the end of the rod and pulled the cable through the power supply zone.
The On/Off power rocker switch can be prised out of its mounting, to allow the brown Live wire to soldered to the switched terminal on the On/Off switch. The blue Neutral wire is soldered to the rear of the AC power socket.
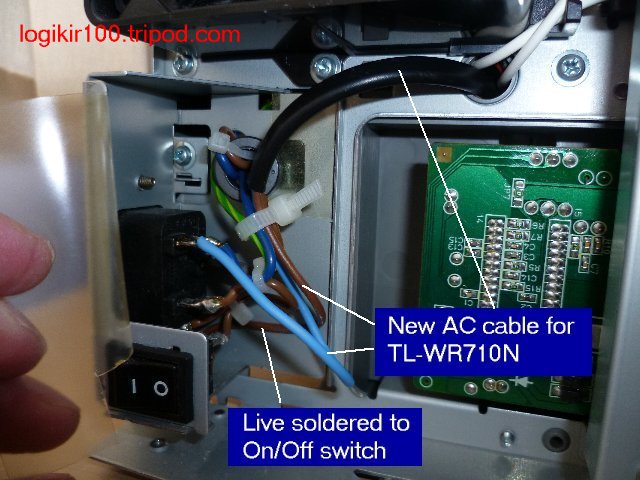
The AC cable actually passes down the right hand side of the router and loops back where it enters the opening to the power supply zone. The slack in the cable also makes it easier to remove the router.
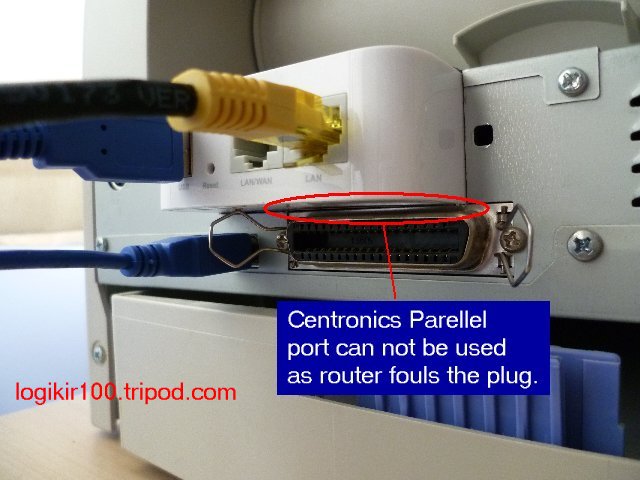
The router protrudes 20mm beyond the back of the printer. It actually touches the top edge of centronics parallel port. This makes it impossible to insert most parallel port plugs. Fortunately, the interface is not likely to be used.
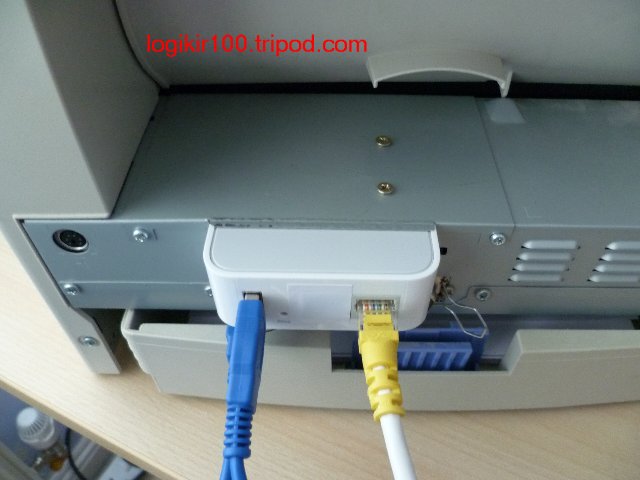
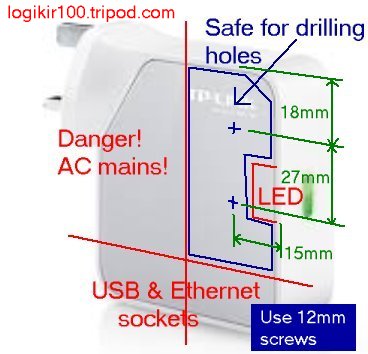
The router is anchored to the removable metal cover. A pair of 12mm screws are visible below. I also used some double sided sticky tape.
The blue coloured USB cable connects the printer to the TP-link router.
The diagram below shows safe drilling zones.
Some internal photos of the TL-WR710N can be found here
https://openwrt.org/toh/tp-link/tl-wr710n
Tip: Make a simple paper template of the outline of the TL-WR710N, mark the pilot holes for the screws, then transfer the template to the metal cover. Remember to fold back the bottom 20mm of the paper template. Drill the holes through the metal cover. Then drill small pilot holes through the metal cover to the router's plastic case and finally use 12mm screws.
There is a 3mm lip on the edge of the metal cover. I simply used some pliers to try and straighten it. Then used a G-clamp to act as a vice to flatten the edge.
The final step is to install OpenWrt onto the TL-WR710N router. Instructions can be found here:
https://openwrt.org/toh/tp-link/tl-wr710n
Warning: Stay clear of the TL-WR710N v2.0. It only has 4MB RAM. The HW version number is printed on label stuck to the router. The v1.0, 1.1, 1.2 and 2.1 models have 8MB RAM.
Recommend using the mature ar71xx images for the TL-WR710N instead of the ath79 images.
Download the LEDE 17.01.6 tl-wr710n-v?-squashfs-factory.bin for your hardware version from here:
https://downloads.openwrt.org/releases/17.01.6/targets/ar71xx/generic/
Download the Openwrt 19.07.4 tl-wr710n-v?-squashfs-sysupgrade.bin for your hardware from here:
https://downloads.openwrt.org/releases/19.07.4/targets/ar71xx/generic/
Update (June 2021): OpenWrt 21.02 is available, however ar71 images are not available. I have not tested the ath79 images. I would suggest to just use the tried and tested 19.07 ar71 images. There is no real benefit to using OpenWrt 21.02 on a print server imho.
Here are the steps:
Switch on the TL-WR710N and wait 2 minutes.
Depress and hold the recessed Reset button for 5 seconds. Release the button when the LED starts flashing.
Connect a computer to the LAN port and point a web browser to the TPlink web UI at 192.168.0.254.
Enter 'admin' for both username and password.
Navigate to System Tools > Firmware Upgrade
Choose the LEDE 17.01.6 squashfs-factory.bin image file.
Click Upgrade button.
After about 3 minutes, point web browser to 192.168.1.1 to bring up LuCI.
Log in. No password required.
Navigate to System > Backup /Flash firmware menu.
Under Flash new image section, select the OpenWrt squashfs-sysupgrade.bin image file (Do NOT use the squashfs-factory.bin file). Uncheck 'Keep Settings', and proceed to upgrade to OpenWRT 18 or later.
After OpenWrt 19.07.x is installed, you will need to make the following changes.
Decide if you wish to assign a static IP address to the printer, or to use DHCP. See end of document for DHCP instructions.
How to assign a static IP address
Change the LAN IP address of the TP-link router. It should be on same subnet as your ISP facing router.
eg. If your ISP facing router's LAN IP address is 192.168.1.254, then change the last digit to a high number less than 254, such as 192.168.1.236 in example below.
Configure DNS server, and gateway address for the LAN interface, for internet access.
The Ipv4 gateway is usually the LAN IP address of your ISP facing wifi router. eg. 192.168.1.254
The DNS server is usually the IP address of your ISP facing wifi router, or you can use an external DNS server such as Google's 8.8.8.8 server.
Navigate to Network > Interfaces menu.
For the LAN interface, click Edit button.

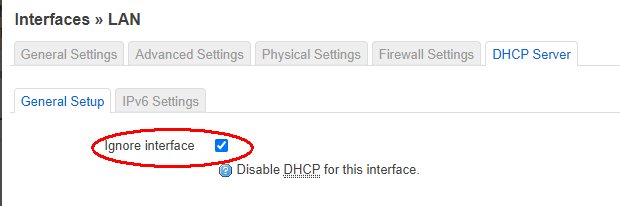
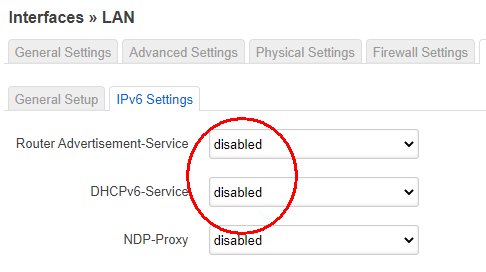
Disable DHCP server (This is very important !) in the LAN interface. Otherwise, devices on your network may not be able to access the internet !!
Delete the WAN and WAN 6 interfaces, so you are left with just the LAN interface.
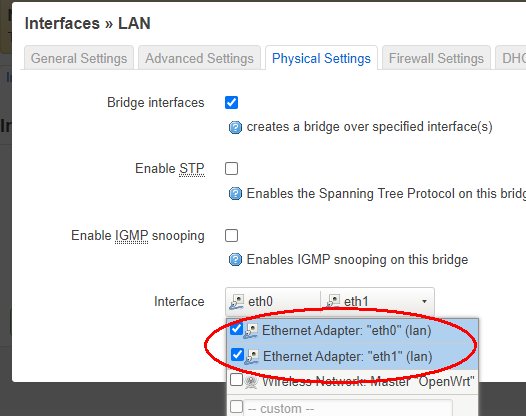
Optional: For the TL-WR710N, recommend to bridge 'eth0' and 'eth1' interfaces so both ethernet ports are enabled. (This method might not work for other routers)
Now connect the TP-link router to your main network with an ethernet cable.
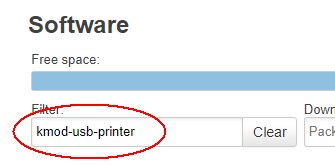
Through the System > Software menu, click on 'Update List'

Next install the following packages:
kmod-usb-printer
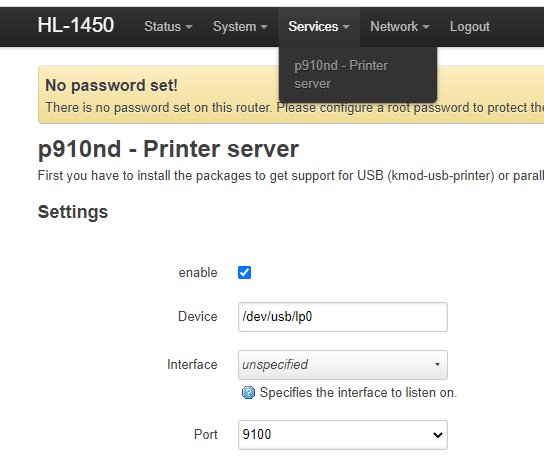
luci-app-p910nd
Finally, tick the check box to 'enable' the print server.
Instructions for setting up network printing on computers can be found here. You will need to know the IP address of the TL-WR710N. eg. 192.168.1.236.
https://openwrt.org/docs/guide-user/services/print_server/p910nd.server
For Windows, the TCPIP port should be configured for RAW printing (aka. JetDirect).
Windows 10 drivers
If you have difficulty installing the Brother HL-1450 printer driver using Windows Update, then Brother have an enhanced PCL5e driver (HL-2250) specifically the HL-1450 on their website on their website which seems to be fully compatible with the HL-1450. It is not for use for other lower models such as HL-1440. (I think it is because HL-1450 comes with 4+4 MB RAM as standard and HL-1440 only ships with 2 MB, but can be expanded by installing a FPM or EDO SIMM)
Otherwise, you can find the Windows PCL and BR-script (for HL-1450/1470) drivers on the 'Microsoft Catalog' website. Search for your printer (eg. HL-1450). There may be multiple entries for the last Windows 8.1 drivers - some of them are actually duplicates.
For 32 bit Windows, you require the X86 driver. For 64 bit Windows, use the AMD64 driver. Download the driver and use WinRAR to extract the contents to a folder (Do NOT use windows explorer because it cannot recreate the folder structure correctly). Check the contents for a folder listed below, to confirm you have the right version.
i386 – this is the Windows 32 bit version
AMD – this is the Windows 64 bit version
There will be an .inf file. You can right mouse click and 'install' the driver pack. Once the driver pack is installed, try again and set up the new network printer. Your printer should be listed under 'Brother'.
There are also old OS X BR-script drivers for macs on Brother website for the HL-1450. I have found the latest driver, despite its age, works with macOS High Sierra.
Wireless printing
You may ask can the wireless on the TP-link router be used to connect to a wifi network. ie. Create a wireless printer?
The answer is 'Yes' in theory. However, in practise, you may find the wifi connection is severely degraded, because more than two-thirds of the TP-link router is shielded by the metal chassis of the laser printer. I don't recommend it.
Personally, I would always opt for reliable ethernet connection every time, rather than use wifi connection for printing.
Can an android or IOS device print to this HL-1450 printer? Simple answer is No. There is no support for mobile devices. If you have a Chromebook with latest ChromeOS, there is native support for printers following the end to Cloud printing support. If you find the HL-1450 driver does not work, try the generic PCL5e driver.
How to configure DHCP
This has been included for completeness only. I would recommend to use static address on the TL-wr710n as described earlier in this page.
Warning: If you choose to use DHCP, you will need to know how to discover the IP address allocated by your router to the TL-wr710n.
If the IP address allocated to the TL-WR710n changes for any reason, your devices will NOT be able to print to the Brother laser printer. For this reason, you should configure your router to provide a static IP address to the TL-wr710n.
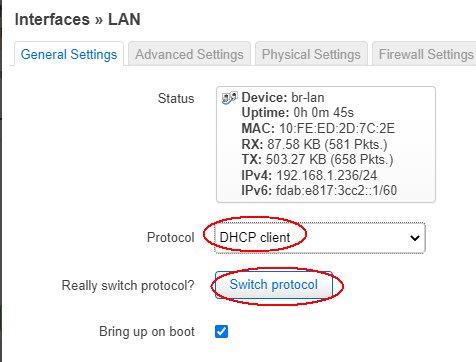
Navigate to Network > Interfaces menu.
For the LAN interface, click Edit button.
Change the Protocol to 'DHCP client'.
Click on Switch Protocol
You can enter a Hostname.
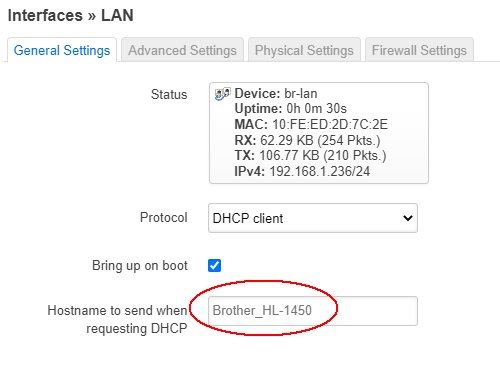
Now press Save and Save & Apply buttons for the changes to take effect.
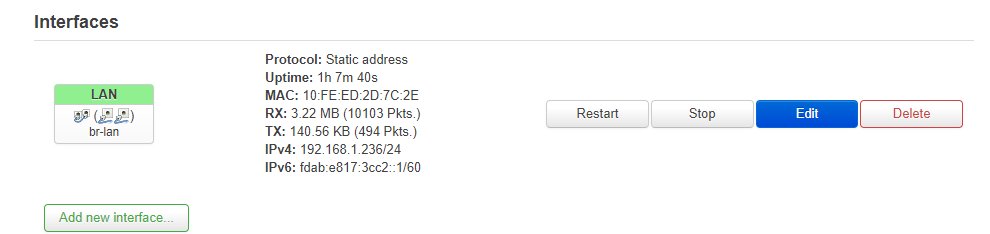
To discover the IP address assigned to the TL-wr710n by your router, log into your router and navigate to the web page which lists currently assigned DHCP devices. Look for the device which matches the MAC address (eg. 10:FE:ED.....) as shown in the above example if you cannot find the Hostname you had entered earlier.
While logged into your router, you should configure it to supply a fixed IP address to the TL-wr710n using its MAC address.
My other web pages
Logitech X-530 subwoofer - tame the bass
Sony SRS-D25 subwoofer – fix for hum/buzz

Pioneer DV-600 DVD player – power supply board repair
